DESIGN & CONSTRUTION ARTICLES Designing with Color & Light
CoCCo
Keeping it Light!
Homes which feature several tall windows located throughout the home are always appealing because they offer additional areas for natural light to flood the interior and are a wonderful style setting architectural feature until it comes to 'dressing' the windows for decorative appeal and the all important sun control. The real challenge lies in coming up with a window treatment that addresses the problem of fading furniture while still allowing full view to the great outdoors…. Hummmm, a problem that can stump even the best and was a personal challenge until I realized that there was two sides to a glass window and that you can address the problem naturally. When you consider that before furniture can fade, the light must first come into the space and that by blocking the sun's harmful rays you would stop the problem of fading furniture; so it's only natural to consider the option of blocking the harmful rays that result in fading the furniture. With this in mind, planting large shade trees outside in the direct path of the rays is always a good solution as is decorative awnings and pergolas. Since this will not always work in landscape restricted areas or if your exterior lot and architectural style will not allow for either the large trees or added exterior sun control features, then the best solution is for a physical barrier to block the rays completely. You can do this with full draperies or vertical blinds but these will block the view to the outside completely and can cost thousands of dollars per opening. A more economical solution is for the modern version of the commercial window film. With today's updated technology, gone are the days of crinkled or silver looking windows and are a design necessity in tropical areas of world for blocking UV rays and heat. The best film, which looks perfectly clear when properly applied is offered by the folks of VISTA FILMS and is priced by the job.
Color is Light & Light is Color
As residential designers and architects, using the design tools of color and light can sometimes be frustrating; not only for the design pro but the client as well. To better utilize these elemental design tools, you must first understand the technical interconnection between the energetics of color and light.
It's in the comprehension of the science of light energy and the practical understanding of neurobiology that we, as designers and architects, can best learn to serve our client's need for aesthetic beauty and innate personal comfort. To make the understanding of the complicities of this subject easy to absorb and then retain, we must first assimilate the following truisms:
-
Color is light and light is color
- The eyes are but one of the ways we receive color
- Each human brain is uniquely wired to perceive color
- The science of light… as it relates to design
Within the scope of humanly understanding, the energy of the electromagnetic spectrum is but one of only two basic wave energies that are known to man. Ranging from short gamma and cosmic rays to the longer less powerful radio waves, the middle portion of the electromagnetic spectrum is dedicated to the visible energy of light, or, what we call color. And it's the center portion of the spectrum, or what we perceive as color that we, as designers and architects, deal with on a daily basis when we specify finishes, select colorations and make decisions based on the energetics of light .
Frustrating situations such as unexpected veiled reflectance, and metamerism are all phenomenon that once understood as conditions directly related to the visible portion of the spectrum can be correctly addressed and then compensated for in our design work. For without this understanding, we are at the mercy of whatever room conditions persist and therefore unable to complete the task of designing the space with the skills of a true professional.
So as we continue in the exploration of the interrelationship color and light, here's a few thoughts to keep in mind:
The color of light energy is comprised of three colors: BLUE, GREEN and RED , which when mixed in the appropriate portions, will produce the seven colors of the visible portion of the spectrum. It's from here that we are then able to produce an endless array of true color. When all three of these colors are mixed in equal proportion then the resulting visible color will be white.
Unlike the man- made primary color wheel or Color Pigment Wheel, the tangible pigments of RED, BLUE, YELLOW will only combine together to form a representation of the desired color. It is only when working with the true LIGHT colors of RED, BLUE and GREEN that we are able to achieve the desired color results - for without this working knowledge of the color of LIGHT our design project color selection efforts will only be a half hearted attempt to specify an exact color because the resulting paint, fabric or finish color will invariably change whenever the room lighting conditions change.
Now, to help in our understanding of how a pigment color relates to one of the three colors of light, one only has to refer to the updated scientifically correct color cube rather than the outdated color wheel whenever looking to mix pigments for a desired result. The multi colored-keyed color cube, unlike the simplistic color wheel, is a great way to visually understand and comprehend the nature of how a pigment will change based on the addition or subtraction of one of the three colors of light. Unlike the color wheel, which is a triad of primary color pigments consisting of fully saturated RED, BLUE and YELLOW, the color cube model represents the primary colors as a light infused display of pigment known as MAGENTA, CYAN and YELLOW. These three colors are unique in that they represent the colors of intangible light energy in a manageable pigmented form.
Another way to understand how the colors of light energy are different from, yet related to, the tangible pigmented colors found on the surface of every known man-made object and material, is to consider this experiment:
Standing outside on a bright and sunny day hold a red sheet of cellophane paper commonly found on individually wrapped hard candy about waist high and examine the color looking down into the paper. Now still holding the paper waist high, check out the color shift as you move indoors… does the slip of cellophane paper loose it's brightness ? … maybe it's now a more burgundy based red or even a dull brick color?
To complete this portion of the experiment, walk into a small closet and turnoff the electric lights and once again check out the color of the red cellophane paper wrapper…still red? Or is it the color of everything else in the room - black?
Now, to demonstrate the color of light versus the color of pigment, once again go outside only this time holding a flashlight with the same red cellophane candy wrapper over the lens. Holding the flashlight waist high, turn on the flashlight and peer down into the lens checking out the color of the red cellophane… is it a bright and clear red color?
Just as before, walk inside your home and examine the flashlight with the red cellophane filter over the lens… is the color and brightness of the cellophane the same as it was outside? And finally walk into the darkened closet and turn out the electric lights….What color and brightness do you now see?
Of course the answer will be the same due to the fact that the white light source from the battery operated flashlight contains ALL three colors of light mixing together to form a bright white light. Thus the reason why the perceived color of the red cellophane wrapper did not change even though you've carried the wrapper with engaged flashlight from the outside, into the house and then into a completely darkened closet whereas without the flashlight providing a white light, the red cellophane wrapper changed color each step of the way depending on the available light source; from the bright light of the outside to the incandescent light inside your home, and finally, to the dark recesses of the closet where the red paper lost all color once you turned out the lights.
In conclusion, the importance of developing a working understanding of the science of light energy and the electromagnetic spectrum as it relates to the design elements of color and light is paramount for our success as design professionals: developing an innate working knowledge and never failing understanding of the interrelationship of color and light will mean that you'll never make a mistake in specifying ANY finish, surface, fabric or paint ONCE you put into practice the scientific truism that the color you specify is only as consistent as the quality of light in any given space. In other words…Color IS light and light IS color, so with that in mind…..expect that all colors found on, and within objects and surfaces, will change based on the color and intensity of the light source found within that space . And as design pros, it's our job to develop a working knowledge of the color of light in order to maximize the design elements of color and light found within our client's projects, our own homes, and our always available paint box of talent.
Lighting Tips for Your Home Office
Here's a few tips to make your work at home more productive, functional, and attractive. And for those of you who don't make a living from your desk at home, listen up, these tips are great for creating a special area in the home in which you can pay your bills, keep up with all of the frustrating insurance paperwork, and of course, set up your computer.
Lighting is one of the most important aspects of creating a special work area, but most folks tend to overlook this fact. They solve immediate darkness problems by plugging in a cheap lamp instead of giving a little thought to the situation. Keep in mind that what you need most from lighting is TO SEE BETTER WHILE YOU WORK, so why use a regular incandescent household lamp? These were designed to give attractive general illumination and not specific or task lighting. Instead, select a swing arm style or a enclosed halogen lamp. These give the necessary light EXACTLY where you need it the most, overtop of your papers, desk pad, and computer keyboard. But a word of CAUTION concerning the halogen type lamps. Because the halogen bulbs burn much hotter than regular incandescent light bulbs, be sure to select a lamp that has been approved by the Underwriters Lab (UL listing). Also be careful not to position the lamp so as to be in contact with fabric draperies or your clothing..yep, that's right, now there is a safety reason why you don't throw your clothing around the room! Another thing…turn out the light when not in use! It gets really hot, plus, by leaving the lamp unattended, the bulb doesn't last as long so you'll have to change the bulb more often. Believe me, changing a halogen bulb is not something you want to do everyday. It is a tricky procedure requiring a little planning and practice. Because the oil on your finger tips can coat the delicate glass housing of the bulb causing it to burst, you'll always need to wear gloves or a protective wrapping whenever handling the bulb. I like to use a baggie or piece of plastic wrap around my fingers, this way I can still "feel" where the bulb needs to go into those little bitty slots where only a person with X-ray vision can see (or is it just anyone with eyes under the age of 40??)
Another area of home office lighting that is often overlooked is windows. Not the regular type of window where you can see outside causing you to daydream instead of work, but a window that will let in natural lighting without causing you a daydream excuse or one that necessitates a window covering expense. What I'm talking about are roof skylights and wall openings filled with glass blocks. Both of these allow for great task lighting as well as give privacy, energy efficiency, and attractive good looks. There are lots of styles and brands on the market today, and some that you can even install yourself! However, I really recommend that before you tackle a project like this you really evaluate your free time and skills level…this is not the time your want to test your hand at home repairs. Also, whenever considering this most effective and attractive source of work space lighting, be sure to look for product upgrades that will protect against the sun's damaging rays. Tinted panes and LOW E glass are well worth the extra $$$$ because these features ensure you won't "cook" on hot summer days…you are planning to work in the summer aren't you?
Light to Work By
Lighting for the home office or other areas in the house where you do paper work and school work is really important. So here's a few additional tips to make your work at home more productive, functional and attractive. And for those of you who don't make a living from your desk at home, listen up…. these tips are great for creating a special area in the home in which you can pay bills, keep up with all of the frustrating insurance paperwork, and of course, set up your computer.
Lighting is one of the most important aspects of creating a special work area, but most folks tend to overlook this fact. They solve the immediate darkness problem by plugging in a cheap lamp instead of giving a little thought to the situation. Keep in mind that what you need most from lighting is TOO SEE BETTER WHILE YOU WORK, so why use a regular incandescent household lamp? These were designed to give attractive general illumination and not specific or task lighting. What you need here is a bright energy efficient light source called halogen. By selecting a feather or swing arm style lamp the new halogen bulb will give you the necessary light EXACTLY where you need it the most, overtop of your papers, desk pad and computer keyboard. But a word of CAUTION concerning the halogen type lamps. Because the halogen bulbs burn much hotter than regular incandescent light bulbs, be sure to select a lamp that has been approved by the Underwriters Laboratory (UL listing) Also be careful not to position the lamp so as to be in contact with fabric draperies or your clothing...yep, that's right , now there's a safety reason why you can't throw your clothes around the room! And another thing...turn out the light when not in use!…it gets really hot, plus, by leaving the lamp unattended, the bulb doesn't last as long giving you necessary light when it's needed so you'll have to change bulbs more often…and believe me, changing a halogen bulb is not something you want to do everyday…it's a tricky procedure requiring a little planning and practice. Because the oil on your fingertips can coat the delicate glass housing of the bulb causing it to burst, you'll always need to wear gloves or a protective wrapping whenever handling the bulb. I like to use a baggie or piece of plastic wrap around my fingers , this way I can still "feel" where the bulb needs to go into those little itty bitty slots where only a person with X-ray vision can see (or is it just anyone with eyes under the age of 40???)
Another area of home office lighting that is often overlooked is windows…no, not the regular type of window where you can see outside causing you to daydream, but a window that will let in natural lighting without causing you a daydream excuse or one that necessitates in a window covering expense. What I'm talking about are roof skylights and wall openings filled with glass blocks! Both of these allow for great task lighting as well as give privacy, energy efficiency and attractive good looks. There are lots of styles and brands on the market today, and some that you can even install yourself! However, I really recommend that before you tackle a project like this you really evaluate your free time and skills level…this is not the time you want to test your hand at home repairs. Also, whenever considering this most effective and attractive source of work space lighting, be sure to look for product upgrades that will protect against the sun's damaging rays. Tinted panes and LOW - E glass are well worth the extra $$$$ because these features ensure you won't "cook " on hot summer days…you are planning to work in the summer aren't you??
Natural Light
A few years ago, I had the opportunity to be walking on a nearby college campus during a wonderful Spring-like afternoon in the middle of an otherwise bleak and dreary winter season. The January sky was crystal blue and the air was sweet with the smell of an early growth. But the most amazing aspect of that afternoon was the natural light flooding the entire area; it was so clear and intense that it made all of the wintertime tree and landscape colors seem to "pop" to life. It was as if the unusually intense light brought out new and additional colors to everything it touched… including my mood. And it wasn't just me who seemed to notice. Everyone of the passing by students seemed to have an accompanying smile to their wandering eye as they reacted to the light by slowing their pace and stopping to enjoy their surroundings. In other words, everyone was not only pleasantly surprised by the unusually warm weather conditions but were actually reacting to the intense clarity and vitality of the natural light, so much so that it made them smile unconsciously and seemed to lift their spirits just "being" in that wonderful outdoor environment.
As a trained professional interior designer I know and understand the benefits of including both artificial and natural light in every project and the affects the added light will have on the final appearance of an interior space. But that winter day, noticing the effects that the natural light had on the outside Vanderbilt students, I couldn't help to recall that same unconscious smile on every one of my clients who have walked into a house detailed and intentionally designed with spacious windows and multiple skylights. It's almost as if their bodies, spirits and overall personalities were reacting and reaching uncontrollably upward to the abundance of natural light much like a house plant bending towards the window to gain more life giving light energy. And when you stop and think about it , why wouldn't we react so emotionally and physically whenever a space is flooded with a life giving energy that God has created so beautifully?
Natural light…it sounds so simple and basic but so important in not only what and how we "see" but also in how we "feel" about our environment. So with that in mind, let's get back to the everyday reality of current building practices and the architectural styles of the average home – small box-like structures with randomly placed window openings on the vertical walls. With what we now know scientifically about the way light effects the body coupled with the new found understanding of the interrelationship of light and color in our designed environments doesn't this building practice of only including natural light openings on vertical walls look out of reason? Unfortunately, that's life in the real world of building; keeping only the bottom line dollar cost and easiest route in mind . And when you face it, adding skylights will add dollars to the final cost of any building project…. but oh the benefits of having light streaming in from above! Now don't get me wrong in questioning the current building practice of only routinely including light openings on vertical walls, because wall mounted windows do serve an important purpose of allowing the occupants to view the outside, a means of secondary escape, and also by adding an architectural element to an otherwise blank wall, but roof windows …now there's the answer if you want to allow natural light to enliven an interior space and to fill the human spirit with that all important sense of comfort and enjoyment.
By now, is your still confused about natural light or if you're having trouble following my logic on the importance on including natural light from the downward orientation into every interior space, I invite you to think back on the last time you went into a dark and dreary basement or underground space. Didn't you automatically "know" that you were far from the natural source of light without even having to look? You could actually 'feel it' on your skin, and within your soul; that instantaneous awareness of light deprivation. From a layman's scientific perspective, the natural light deprivation causes an immediate neurochemical reaction resulting in a physical response that can only be described as the skin "creeping" . In other words, your body automatically reacts in a physical way that lets you know that you are entering into a space devoid of life giving light. We recognize this reaction as a feeling of discomfort and we feel it! With that in mind, I'd like to invite you to consider making an investment in your emotional, physiological and general sense of well being by installing roof windows and skylights wherever you can throughout your home...not only will your decorating colors will be vastly improved but more importantly your mood will lift and your spirit will thank you!
Getting It Right with Light!
Haven't you ever walked into someone's home that was so dark and heavy with the lack of light that you felt like you were in a cave? Is it no wonder that under conditions like this even the best of color schemes and placement arrangements will go unnoticed simply because you can't see it ? Well in the rush to fix the problem, unfortunately the first response of adding higher wattage bulbs is not enough to get the job done. Instead what is needed is a completely different way of calculating and then providing your residential lighting requirements to showcase your decorating efforts and l provide enough light to allow you to function in your home while not feeling like you are in an overly bright operating room. So to get you thinking in the right direction here's a few pointers:
Forget about a single light source instead think in layers. By that I mean a multiple of lighting coming from various directions and locations around the room . In other words, for a typical 12 x 20 living room you should have a minimum of 4 table lamps. 2 floor uplights, and 4 recessed ceiling lights positioned throughout the space. And for a quick formula to determine the amount of wattage necessary to get by check this out. Please keep in mind however that even though the correct factor would be based on lumens or light output necessary to provide adequate visibility you can use this simple formula because I am using wattage as the factor to consider since most folks are more comfortable in using this number to purchase light bulbs . Simply determine the room size then multiply the total square footage by 1.5 to determine the wattage necessary to light the space minimally with your 4 lamps, 2 uplights and 4 ceiling cans.
LIGHTING 101
Whether you work from a well organized desktop or call the kitchen table your executive suite, everyone needs quality lighting in order to complete the tasks at hand. For most folks, this means a higher wattage lightbulb and the use of whatever lamp is handy . But to give yourself the recommended light levels that you’ll need to get the job done, check out these tips:
- Replace the bulbs in overhead recessed light fixtures with the readily available brighter and longer lasting PAR bulbs. Most parabolic reflector bulbs are halogen technology based which means a cleaner, brighter light while saving you money because they last 33% longer than an average bulb. SHOPPING TIP: All PAR bulbs look and feel heavier than a standard reflector bulb and appear to have thousands of tiny mirrors inside. Expect to pay a few dollars more for a bulb that will not only increase the lumens or available light output but can also improve your overall productivity and comfort by as much as 8% ( 1980 RMI/ US Postal office study ) simply by raising the interior room light levels in the areas where you work.
- Consider adding an adjustable arm desk lamp to your work area for improved lighting levels . To make the most of this directional light source, be sure to install the correct bulb for your lighting needs. Again , halogen is the technology of choice and it’s now available in the standard medium base socket bulb which looks and fits just like an ordinary light bulb so it’s perfect for just about any lamp style.
LIGHT
Add sparkle to any room by adjusting your existing lighting levels simply by changing the bulbs: Use brilliant cut crystal halogen bulbs in chandeliers and wall sconces to cast a decorative texture of light up onto the ceilings, or what I like to call the 5th wall. Be sure to decorate it with light by using the new quartz faceted HALOGENA BRILLANT CTYSTAL bulb from PHILIPS. When the bright clear halogen light hits the broken faceted design of this uniquely shaped bulb, the light will actually bend or refract the light creating a wonderful textured pattern of lightness up on the ceiling…And just think...actually changing the color of your ceiling without a messy bucket of paint. All from a simple $5.00 light bulb!
Another tip, be sure to install smooth faced Reflector bulbs in any recessed light fixture in a room where the ceiling is eight foot or under; a typical six inch recessed light fixture generally accepts a bulb that is labeled R30.
For ceilings over eight foot in height, use a Parabolic Reflector bulb for an extra punch of light. This type of bulb is usually packaged with the designation of PAR 30 or PAR 36 on the side of the box and it's always a great idea to consider the heavier and longer lasting Philips brand HALOGEN PAR bulbs to really pump up the light levels of any room. I've used their longneck PAR 30 halogen bulbs in my office for years to showcase all of my fabric samples and to provide more light over top of our desks and workstations.
Light is a wonderful decorating and design element but only if you are able to control the light and it's damaging effects from harmful ultraviolet rays . With so many decorative window treatment options available today, why not consider the one choice that is not only attractive but does double duty when it comes to controlling the light and protecting your valuable furnishings from sun damage. The SILHOUETTE, a sheer fabric horizontal shade from HUNTER DOUGLAS is a real home fashion breakthrough when it comes to good looks, great styling and living up to the public relations hype…Over the years , this is the one drapery product that I've felt that really does what it's designed to do - soften the room with a tailored double layer of sheer fabric that controls the suns damage by filtering the direct rays and then stopping up to 66% of the harmful ultraviolet rays - you know… that aspect of sun damage that will change the color on the back of your sofa or even bleach out the sun patterns on your carpeting. To find out more and to see the many color and textures available please checkout their web site… it's such a great site that I just love to check it out often to get ideas for my client's windows… See what you can find!
For additional lighting throughout the house, consider quality crafted lamps - the number one decorative accessory for every room. Not only do lamps add a decorative flair to every space by providing the necessary light for us to function within our homes, but they now add that all important touch of design savvy to every space by acting as a style setter for our interpretations of personal taste…a tall and slender lamp is a perfect choice for today's soft contemporary open floor plan rooms featuring soaring ceiling lines, while a heavily carved aged bronze metal floor lamp with richly hued copper silk-like shade is the optimal choice for any traditional setting requiring a massive masculine feel.
With so many options in lighting today, how do you go about selecting the best lamp for your space? Easy, do what I do: look for lasting quality, clean lines and fashion forward style and expert coloration, the three main ingredients for each and every lamp manufactured by the industry leader KICHLER. To see their many lamp offerings - featured in room setting that will help to define your style and lamp options - please be sure to check out their web site.
TEXTURE
Every pro knows that a room devoid of several interesting and varied textures within each and on every surface is nothing short of a hospital operating room. To get the jump on adding the design necessity of texture to your home, check out these tips:
For a heavily texturized money saving option when it comes to hard surface flooring, be sure to take a second look at today's vinyl resilient flooring. Everything from the look and sound of real stone underfoot to the enticing luxury of high-end design leather floor tiles, the new floors from MANNINGTON feature so many different patterns, styles and colors that I can't say enough about the new flooring choice among designers… As a matter of fact, I've even specified their SHAHGRA LA sisal pattern for my son's new home ….my new daughter- in-law to be loves it! Find out more by visiting their Web site.
And to add texture to your walls without a lot of time, effort or money, simply get out the old paint brush and dip into a big bucket of mud…sheet rock mud that is! For a really style savvy design treatment apply a thick layer of pre-mixed sheet rock mud to your walls in a random, yet smooth pattern. Then, with the broken bristles of a large paint brush stipple the wet mud surface and add a few feathery swirls wherever the mood strikes. Now for the hard part…sit back and let dry for at least 2 days before you apply two coats of your favorite latex satin paint. See how easy that was to create a heavily texturized faux painted wall treatment !
COLOR
If I had but one piece of advice to offer a homeowner about to style and furnish a totally empty room it would be this: be brave and add color…lots and lots of color ! And the best way to add the all important design element of color is to paint the walls a real color...no, off- white does not fit the bill here! I'm talking COLOR!... from rich earth toned reds to pale springtime fresh celery greens… go for it and add color to the walls! And the best way to select the color that is best for your space is to understand that those little bitty paint chips found in the stores are just a REPRESENTATION of the final color and not an exact reading. Also, those paint chips WILL CHANGE color depending on the amount of natural light coming into the room, the other colors found throughout the room and more importantly, the time of day. With that in mind be sure to pick up several paint chip strips and evaluate the color several times throughout the day and evening hours. And since the final paint you select will appear lighter than the chips once it's applied to your walls, follow this advice: using a standard paint chip selector, determine the paint color you like and then BUY the next DARKER one!
Pulling a room together is sometimes a difficult task because the one rule of decorating know-how is timidly overlooked: mixing patterns, styles, textures and colors all within one room. With so many home fashion manufactures making it easy to help the homeowner take the plunge and begin mixing and matching like pros I sometimes wonder why folks are still having difficulty. It could be they haven't discovered the designer quality fashions of WAVERLY. Sure the company's been around for years serving the design community exclusively but it's only recently that the average consumer can now take advantage of years of insider knowledge with their expanded line of design and color coordinated textiles and accessories; everything from fashionable throw pillows with high end fringes and decorative trims to hand hooked area rugs and even style-forward soap dispensers and light switch covers - everything the homeowner can ask for in helping to pull together a room or entire house. And if I sound like I'm playing favorites…your right! Waverly has been in my design shop since 1978 and my clients love the look of their coordinated line of colorful patterns, textures and colors…and I know you will too! To see for yourself, check out your local home fashion retailer or visit their site.
-
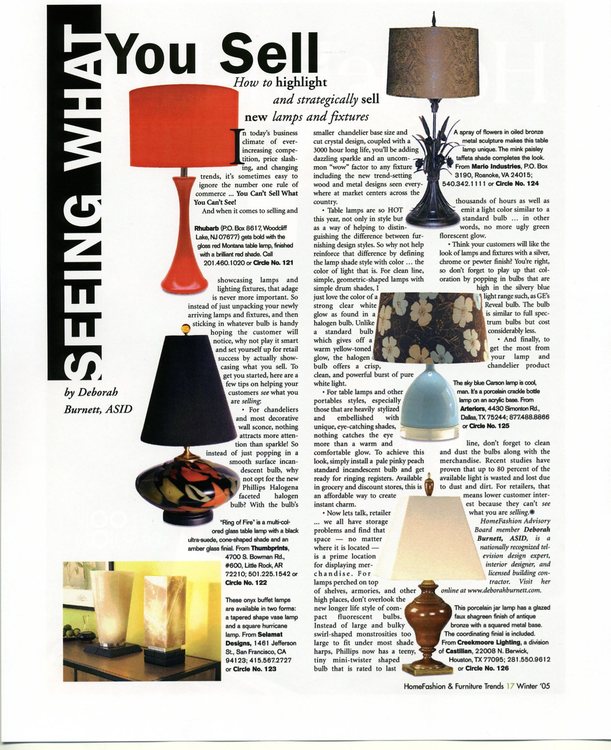
Seeing What You Sell by Deborah Burnett
Home Fashion & Furniture Trends Magazine

- It's All in the Packaging: Color's Effect on Consumer Choices
Published 05/20/09 Sherwin-Williams Stir
by Holly O'Dell
|